In my first post, I laid out the plan for a 30-day experiment using ChatGPT as a golf practice assistant.
The idea was to upload swing videos, create contact sheets, review launch monitor data, get practice recommendations, and see whether using AI could help me practice more effectively.
After thinking about it more, I’m changing the format slightly.
Instead of doing frequent updates every few days, I’m going to make this a monthly swing update. That seems more realistic. Golf swing changes take time, and it is easy to overreact to one range session, one video, or one small sample of launch monitor data.
A monthly update gives me more time to work on something, collect new video, compare data, and decide whether anything is actually changing.
This is the first follow-up.
The short version:
The launch monitor data looks better. My club path is much more neutral, and the ball flight pattern is more playable. But the video still shows that I lose some hip depth, my right arm can get trapped around delivery, and low point is still the biggest problem.
What I Uploaded This Time
For this update, I uploaded several new swing videos and launch monitor data from an 8-iron session.
I asked ChatGPT to:
- create new contact sheets
- identify the key swing positions
- compare the new video to previous swings
- review the launch monitor data
- diagnose the biggest current swing problems
- suggest one or two drills for the next month
This is where the process got interesting.
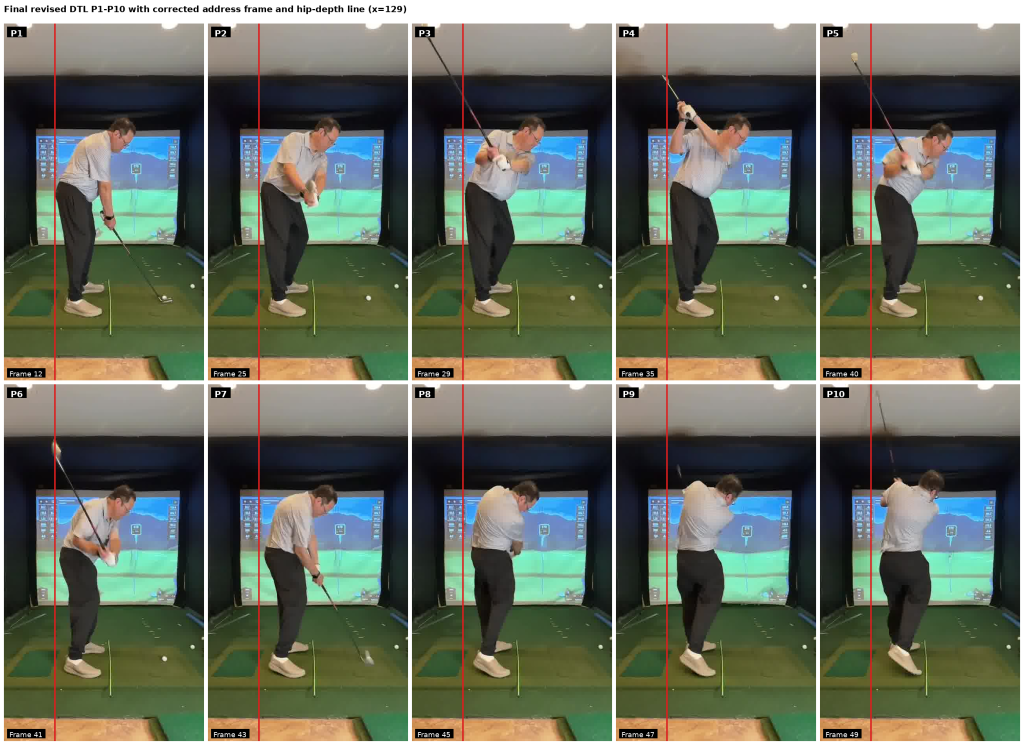
The first version of the contact sheet was useful, but not perfect. Some of the key frames needed manual correction. P1 was originally too late because the club had already started moving away from the ball. P2 and P6 also needed closer review.
That is worth pointing out because it is one of the lessons from this whole experiment:
ChatGPT can do a lot of the work, but the golfer still needs to review the output.
It is not magic. It is a tool.
Why the Contact Sheet Needed Correction
A golf swing moves fast. If the video is not high-speed enough, certain positions can fall between frames.
That happened here.
P2, P3, P4, P5, and impact were pretty clear. But P6 was difficult. Ideally, from down the line, P6 would be the frame where the club shaft is parallel to the ground in the downswing. More specifically, I like to see the clubhead near the same height as the hands.
In this video, the frame rate did not capture that exact position. One frame was too early, and the next was a little late. So the P6 image in the contact sheet should be treated as an approximation.
That does not make the contact sheet useless. It just means the analysis needs to be honest about the limitation.
The important thing is not the exact freeze-frame label. The important thing is the pattern the sequence shows.
And the pattern is still visible.
What the Launch Monitor Data Showed
For this session, I was hitting 8-iron with the Cobra 3DP X irons.
The average numbers were:
| Metric | Result |
|---|---|
| Shots | 23 |
| Carry distance | 161 yards |
| Total distance | 170 yards |
| Club speed | 85 mph |
| Ball speed | 113 mph |
| Smash factor | 1.32 |
| Launch angle | 19.9° |
| Attack angle | -4.4° |
| Descent angle | 46.4° |
| Backspin | 5527 rpm |
| Path | 1.9° right |
| Horizontal launch | 0.8° right |
| Spin axis | 1.9° left |
| Offline | 0.4 yards left |
Those numbers are encouraging.
Earlier in this project, my path was much more in-to-out. That matched my normal miss pattern: shots starting right and curving too much left.
This session was different.
A path of about 2° right with a small left spin axis is much more playable. The ball was generally starting slightly right and curving slightly left. The average offline number was essentially centered.
That suggests the work on keeping my hands and arms more in front of me has helped.
The face angle columns in this GSPro export were not useful because FaceToTarget and FaceToPath were both zeroed out. So I cannot directly say what the face angle was from those columns.
But the ball-flight data itself does not suggest a major open-face problem.
That is an important correction from my initial interpretation.
If the ball starts slightly right and curves left back toward the target, the face may be slightly open to the target, but it is not open relative to the path. In that case, the face is doing something playable. It is not the main problem.
The bigger issue is still contact quality.
The averages look good, but I still had too many fat shots and low-smash outliers. That is probably the main theme for this update:
The swing is producing better average numbers, but the bad contacts are still too costly.
What Looks Better
The biggest improvement is the club path.
I am no longer living in a pattern where the club is coming too far from the inside. That is a major improvement because it should make the ball flight easier to manage.
The down-the-line video also looks better than earlier swings in one important way: the club and arms are not getting quite as dramatically stuck behind me.
That said, I do not think the swing is fixed.
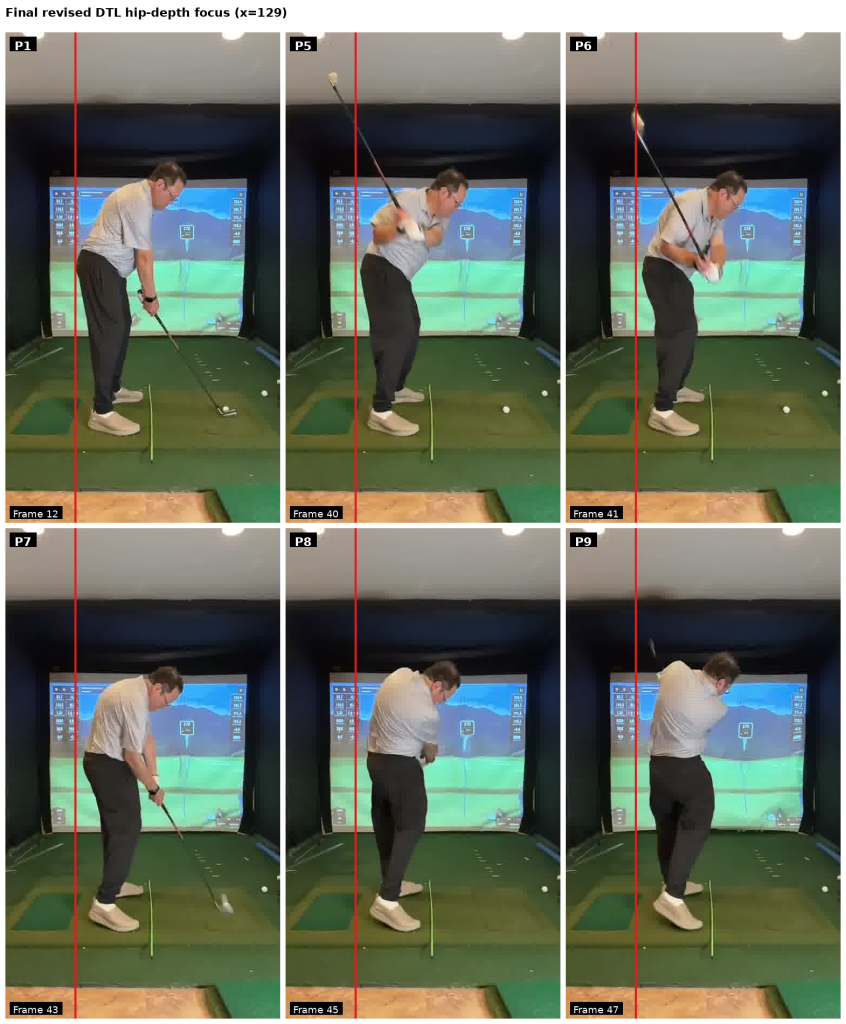
The corrected down-the-line contact sheet still shows that I move away from the hip-depth reference line. I move away from it a bit during the backswing, and more during the downswing.
That suggests I am still losing some space.
It does not look like a massive early-extension move, but it still matters because even a small loss of space can crowd the arms and affect low point.
The Main Video Issue: Hip Depth and Right Arm Space
The biggest thing I see in the down-the-line contact sheet is that the right arm still looks trapped around the delivery position.
Again, P6 is not a perfect frame because the video does not capture the exact shaft-parallel position. But the surrounding frames still show the issue.
My hands are more in front than they used to be, but they still do not appear to have as much room as I would like. The trail arm/right arm looks crowded. The club is in a more neutral delivery than before, but the space through the strike is still not ideal.
That may explain why the path number improved while the fat shots did not completely disappear.
The old problem was:
Too far from the inside, too much draw/hook pattern.
The current problem looks more like:
Better path, but still crowded enough that low point and strike quality are fragile.
That is a different stage of the process.
I do not want to go back to the old pattern just to avoid fat shots. The better goal is to keep the improved path while creating more room through delivery.
The Face-On View
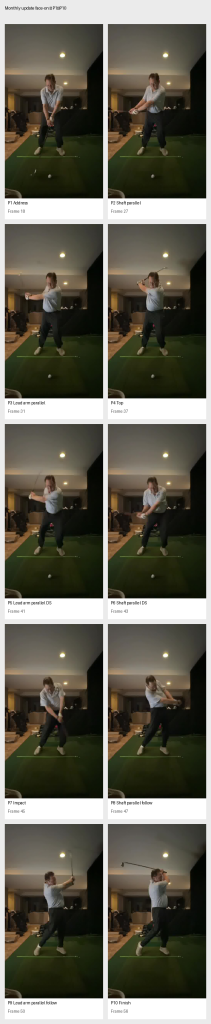
The face-on video adds another piece.
From face on, I still think the lead side is important. I have been working on staying more over the ball, which has helped in some ways. But I may also be staying flexed too long through the lead side.
That can create a problem.
If I try to “stay down” too much, the lead leg can remain soft, the lead hip can clear late, and the club can bottom out too early. That can lead to fat contact.
I do not want to snap the lead knee straight or jump out of posture. But I do want the lead side to firm up at the right time.
The feel I want is:
Pressure left, lead leg firms, lead hip goes up and back, chest turns through.
That is different from just staying down.
Revising the “Open Face” Interpretation
My first reaction was to wonder whether some of the misses were from the face staying open.
After looking at the raw launch monitor data, I would soften that interpretation.
The data does not show a persistent open-face pattern. The average ball flight was basically a small push-draw:
- path slightly right
- start line slightly right
- spin axis slightly left
- average offline almost exactly on target
That is generally a playable pattern.
There were individual shots that finished right, but the overall data does not suggest that the face is the main problem. In fact, most shots had leftward spin axis, which means the face was likely neutral to slightly closed relative to the path.
So I do not want the next month’s practice to become a “close the face” project.
The better interpretation is:
The face and path are in a much better window. The bigger issue is whether I can control the bottom of the swing while keeping that improved delivery.
That is an important distinction.
If I over-focus on closing the face, I could easily bring back the old overdraw pattern. I do not want that.
Updated Diagnosis
My current swing is moving in the right direction.
The launch monitor data shows a much better path. The ball flight pattern is more neutral. The swing looks less stuck than it did earlier.
But the video still shows some problems:
- I move away from the hip-depth line in the backswing.
- I move more away from it in the downswing.
- The right arm still looks trapped around delivery.
- P6 is hard to judge precisely because of frame rate.
- Low point is still inconsistent.
- The fat shots and low-smash outliers are more concerning than the face angle.
So the diagnosis is not “go back and start over.”
The diagnosis is:
Keep the improved path, but create more room through delivery and get the lead side working better so low point and strike quality improve.
What I Am Not Going to Do
I do not want to chase a bunch of new swing thoughts.
I also do not want to make the practice plan about simply fixing the result.
For example, a line or tape drill on the ground can be useful as feedback. It can show where the club is bottoming out. But for me, I do not want that to be the main drill because it mostly shows the result.
A fat shot tells me the club hit the ground too early. It does not necessarily fix why the club hit the ground too early.
I want to work on the cause.
For me, the likely cause is how the lead side and delivery space are working.
Drill 1: Lead-Side Post / Hip-Up-and-Back Drill
This will be the main drill for the next month.
The goal is to train the lead side to support the downswing without standing up early or hanging back.
I do not want to snap the lead knee straight. I want the lead leg to begin firming so the lead hip can move up and back through the strike.
The key feel is:
Pressure left, left hip up and back, chest turns through.
I’ll start with slow rehearsals.
From the top, I’ll move down toward the delivery area and pause. Around that point I want to feel:
- pressure in the lead foot
- lead leg beginning to firm
- lead hip moving up and back
- chest still over the ball
- hands still having room
- no handle drag
Then I’ll swing through to a balanced finish.
The plan:
- 10 slow rehearsals without a ball
- 10 rehearsals pausing near delivery
- 10 half shots
- 10 three-quarter shots
- 10 normal 8-irons trying to keep the same feel
The goal is not to force a position. The goal is to create more room through impact and make low point more predictable.
Drill 2: Smart Ball / Right-Arm Space Drill
The second drill is for the trapped-right-arm pattern.
Earlier, the Smart Ball helped me keep my arms more organized and in front of my torso. I want to use that again, but with a more specific purpose.
The goal is not just connection.
The goal is:
Arms organized, lead hip clearing, right arm has room.
I’ll use the Smart Ball between my forearms and make slow swings to the top, then down toward delivery. I want to feel that my arms stay in front of my chest without being pinned or tense.
At the delivery checkpoint, I want:
- right arm in front of the rib cage
- hands with room
- lead hip moving up and back
- chest still over the ball
- no slide toward the ball
- no forced hold-off
The plan:
- 10 slow rehearsals with the Smart Ball
- 10 slow rehearsals stopping near delivery
- 10 half shots with the Smart Ball
- 10 normal shots without it, trying to recreate the same structure
This drill should help me keep the improved path without letting the right arm get trapped.
The Swing Thought for the Next Month
For the next month, I want one main swing thought:
Hands in front, left hip up and back, right arm has room.
That blends the three things I am trying to improve:
- keep the club from getting stuck behind me
- use the lead side better
- create enough delivery space to control low point
I want to avoid thoughts like:
- stay down
- close the face
- hold the face off
- drag the handle
- swing more from the inside
- straighten the lead leg hard
Those thoughts could send me in the wrong direction.
What I’ll Track Next Month
For the next update, I’ll track:
- average carry
- carry consistency
- smash factor
- number of shots below 1.28 smash
- number of shots below 150 yards carry
- path
- spin axis
- offline average
- fat-shot count
- right-arm space around delivery
- movement relative to the hip-depth line
I’ll also compare the next down-the-line video to this one.
The specific things I want to see:
- less movement away from the hip-depth line
- more room for the right arm around delivery
- less trapped look around P6
- same neutral path
- fewer fat shots
- fewer low-smash outliers
That would be real progress.
Bottom Line
This was a useful update.
The swing is not fixed, but the trend is positive.
The launch monitor data shows that the path is much better. The ball flight is more neutral. The average offline number is essentially centered. That means I should not overreact and turn this into a face-angle project.
The corrected DTL view still shows the real issue: I lose hip depth and space, and the right arm still looks trapped around delivery. That likely connects to the fat shots and low-smash outliers.
So the next month has a clear focus:
Keep the better path, but improve lead-side posting, hip depth, delivery space, and low-point control.
That is the value of doing this monthly.
I have a video baseline, launch monitor numbers, a focused diagnosis, and two drills to test.
Now the question is whether the work actually shows up next month.
Discover more from Ten to Scratch
Subscribe to get the latest posts sent to your email.