Putting practice often consists of rolling several balls toward a hole without a clearly defined goal. That may help you become comfortable with the speed of a green, but it does not always provide enough feedback to create meaningful improvement.
I recently attended a short-game clinic with Kevin Weeks, the 2023 PGA Teacher & Coach of the Year and Director of Instruction at Cog Hill Golf & Country Club. The clinic included several putting stations designed to develop specific skills rather than simply count how many putts went in.
The drills addressed four essential parts of putting:
- Starting the ball on the intended line
- Understanding how break and speed interact
- Controlling distance on long putts
- Reproducing your stroke when the result matters
The stations were useful on their own, but the clinic offered another major benefit: Kevin watched us perform the drills and provided individualized feedback. That helped ensure that we were practicing each drill correctly rather than simply repeating our existing mistakes.
Here are the five putting drills we worked on and how you can recreate them on your own practice green.
1. The Long Double-Breaking Putt Drill
The first station was a downhill putt of approximately 60 feet with two distinct breaks.
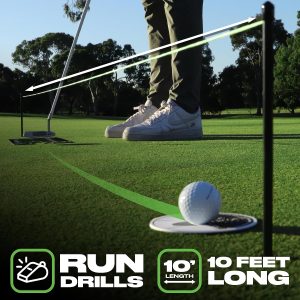
A stake was placed several feet behind the starting position and another a short distance beyond the hole. A bungee cord was pulled tightly between the stakes, several inches above the ground. The stake beyond the hole could be repositioned until the bungee represented the intended starting line.
The ball was then rolled underneath the cord.
The purpose was not for the ball to follow the cord all the way to the hole. On a double-breaking putt, that would be impossible. Instead, the cord provided immediate feedback during the first few feet of the putt.
When the ball started to the right or left of the cord, you knew immediately that you had missed your intended starting line.
What the Drill Teaches
This drill combines several skills that are difficult to practice independently.
Starting-line control: The bungee makes the intended initial direction visible.
Long-distance speed control: A 60-foot downhill putt requires a much smaller and more controlled stroke than many golfers expect.
Reading multiple breaks: Repeating the same putt helps you see where the first break begins to give way to the second.
Matching speed to read: A putt traveling too quickly will resist the break, while a slower putt will move more dramatically with the slope.
That final point is especially important. There is not one universally correct line for a breaking putt. The appropriate starting line depends on the speed at which you intend to roll the ball.
By repeating the same putt while receiving immediate start-line feedback, you begin to understand how your chosen speed changes the entire shape of the putt.
How to Recreate It
Find a long putt with visible movement in both directions. Place one stake behind the ball and another beyond the hole, then stretch a raised bungee cord or string between them.
Adjust the far stake until the cord represents your intended start line. Hit several putts while evaluating three separate results:
- Did the ball begin on the intended line?
- Did the ball follow the break you expected?
- Did it finish the correct distance from the hole?
This was one of the better drills I have tried for combining green reading, start-line control, and lag putting.
2. The 15-Foot Breaking Putt Start-Line Drill
The next station used the same stake-and-bungee setup, but the putts were approximately 15 feet long and had a single break.
The far stake was adjusted until the bungee pointed along the intended starting line. We then repeated the putt, watching whether the ball began directly underneath the cord before moving with the slope.
At 15 feet, the relationship between speed and break becomes easier to see.
A firmer putt generally holds its initial line longer and takes less break. A slower putt begins moving downhill sooner and requires a higher starting line.
Why the Drill Is Valuable
Golfers often blame a missed breaking putt on a poor read when the real problem was a missed start line. At other times, the ball may start exactly where intended, but the chosen speed does not match the chosen line.
The bungee helps separate those variables.
When the ball starts away from the cord, it was primarily an execution problem.
When it starts on the cord but misses high or low, the issue was more likely the read, the speed, or the relationship between the two.
That makes the practice much more informative than simply watching whether the putt goes in.
Experiment With Different Speeds
Once you have found a combination of line and speed that works, try hitting the same putt with slightly different intentions.
Roll one ball firmly enough to finish 12 to 18 inches beyond the cup. Then try another that would barely reach the hole.
You should see that the slower putt requires more break, while the firmer putt can be started closer to the hole.
The goal is not necessarily to decide that one approach is always better. It is to understand which combination of line and pace feels most natural and repeatable for you.
While you can make your own, they do sell pre-made kits that have some nice additional features like beads along the string to monitor stroke length. This one is a 10 foot model you can buy on Amazon:
3. The Short-Putt Pressure Gate Drill
The third station focused on putts from approximately three to four feet.
The primary setup began with a slightly uphill putt with no side slope. Kevin recommended checking the surface with a level when possible so that you know the putt is actually straight.
Two tees were placed approximately eight inches in front of the ball, one on each side of the target line. The gate was only slightly wider than the ball.
To hole the putt, the ball first had to pass cleanly through the gate.
Add a Consecutive-Make Goal
The mechanical part of the drill is straightforward, but the real challenge comes from the scoring system.
Choose a number of consecutive putts that you must make before stopping. Kevin suggested beginning with 50 and eventually working toward 100.
A miss resets the count.
The first several putts may feel easy. Once you reach 40 or 45, however, the next putt begins to feel considerably more important. Missing means losing all the progress you have accumulated.
That creates a form of artificial pressure.
It is not exactly the same as facing a four-footer to win a match or save your best round of the season, but it forces you to manage some of the same thoughts:
- Do I become more careful with my stroke?
- Does my routine change?
- Do I begin steering the ball?
- Can I remain committed to the same start line?
The drill therefore trains more than short-putt technique. It teaches you to reproduce that technique when you care about the outcome.
Add Right-to-Left and Left-to-Right Putts
Kevin also created similar stations for short breaking putts in both directions.
This is important because most golfers are more comfortable with one direction of break. A right-handed golfer might prefer seeing a right-to-left putt, for example, while feeling less certain when the ball needs to move left to right.
Practice the direction that gives you the most trouble more frequently.
You can also create two different speed challenges.
On one station, use a higher starting line and softer pace. The ball must pass through the gate slowly enough to take the break and enter the cup.
On another, use less break and a firmer pace.
This teaches you that even from four feet, the center of the hole is not always the appropriate target. Your intended entry point and gate position should reflect the speed you plan to use.
4. The Competitive Distance-Control Ladder
Another station used a target frame Kevin had built from conduit pipe.
The frame formed a raised rectangle approximately three feet deep and four or five feet wide. It could be pressed into the ground while remaining high enough for putts to roll underneath it.
The frame surrounded the hole, with the cup positioned near the front edge of the target area. That left a larger section of the rectangle beyond the hole to catch putts that had the correct general speed but did not fall.
For a simpler and more portable version, you could mark the corners and borders of the target area with tees. The exact dimensions are less important than using the same clearly defined zone for every putt.
Set Up the Ladder
Place starting markers at:
- 5 feet
- 10 feet
- 20 feet
- 30 feet
- 40 feet
- 50 feet
Hit three putts from the first distance. A successful putt is either holed or finishes within the target area.
The scoring system determines whether you move backward, remain at the same distance, or move forward.
Three successful putts: Move back to the next station.
Two successful putts: Remain at the same distance.
One or fewer successful putts: Move forward one station.
The goal is to see how far away from the hole you can progress.
Kevin said the drill generally begins to become difficult for many golfers somewhere between 20 and 30 feet. At that point, the required stroke becomes longer and small errors in contact or tempo produce much larger distance variations.
Why This Is Better Than a Traditional Ladder Drill
Many ladder drills ask you to stop each ball slightly farther than the previous one. That can be useful, but this version adds consequences.
A poor set does not merely end the drill. It moves you closer to the hole and forces you to earn your way back.
You are therefore practicing three things simultaneously:
- Producing the correct speed
- Repeating that speed three times
- Adjusting when the distance changes
The target zone also reflects the practical goal of long putting. From 40 or 50 feet, you are unlikely to hole many putts. Success means controlling the first putt well enough to leave a routine second putt.
5. The High-Side Entry-Point Drill
The final station used a device that fits inside the cup.
The device forms a ring that blocks most of the hole while leaving one small opening through which the ball can pass. The ring can be rotated so that the opening faces any portion of the cup. You can buy one on Amazon for around $15 by clicking on the image:
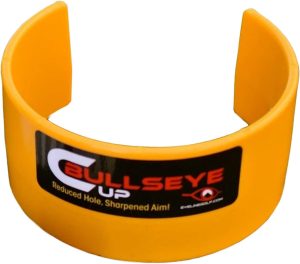
For a breaking putt, the opening is turned toward the appropriate high-side entry point.
The golfer must then choose a line and speed that allow the ball to enter through that smaller opening.
What This Drill Changes
Most golfers visualize a breaking putt only in terms of how far outside the hole they should aim. They do not always consider where the ball should enter the cup.
Those are related but different questions.
The entry-point device forces you to visualize the final few inches of the putt:
- From what direction should the ball approach?
- How quickly should it be moving?
- How much break should occur immediately before the cup?
It also makes the target considerably smaller. A putt that might catch the side of a normal cup can be rejected by the ring.
That encourages greater precision without requiring you to make mechanical changes to your stroke.
This drill is particularly valuable on short and medium-length breaking putts, where a small speed error can change the entry point enough to produce a lip-out.
The Value of Individual Putting-Stroke Feedback
The practice stations were useful, but an additional value of the clinic was getting Kevin’s individual feedback.
In my case, he identified two setup and stroke tendencies.
Matching Backswing and Follow-Through Length
I tended to make a slightly shorter backswing followed by a noticeably longer follow-through.
I grew up hearing that the putter should “accelerate through the ball,” and my stroke reflected that idea. I would make a controlled backstroke and then add speed aggressively through impact.
Kevin wanted the stroke to feel more balanced, with the backswing and follow-through closer to matching in length.
The intention was not to stop the putter immediately after contact or to make every stroke perfectly symmetrical. It was to remove the feeling that I needed to provide a late burst of acceleration.
A longer, more complete backstroke allows the putter to build the required speed more naturally. The putter can then move smoothly through impact rather than being pushed or hit at the ball.
Adding Softness to the Arms
Kevin also wanted me to allow more bend in my elbows.
I had been setting up with my arms relatively straight and swinging them independently. By softening the elbows, my upper arms could remain more connected to the sides of my torso.
That encouraged more body rotation and less isolated arm movement.
This was a larger adjustment for me than changing the length of the stroke. It changed how the entire motion felt and required time before it began to feel natural.
It is also a good example of why individual instruction matters. Another golfer at the same clinic might have received the opposite advice based on a different setup or movement pattern.
The drills can be useful for almost everyone. The mechanical correction should be based on what your own stroke needs.
Should You Use an Alignment Line on the Ball?
Kevin also shared strong preferences regarding visual alignment aids.
He does not like golfers using an alignment line on the ball, and he believes many players perform worse with one. He similarly prefers putters without long alignment lines, favoring a single dot above the center of the face.
His reasoning is that prominent lines can become a distraction rather than an aid.
This is an area where I would treat the recommendation as player-dependent rather than a universal rule.
Some putting studies have failed to find a meaningful overall benefit from using a line on the ball. Other research has found an advantage under certain conditions or from certain distances. The available evidence does not appear to support a rule that everyone should – or should not – use a line.
A golfer who becomes overly focused on making the line appear perfect may putt more freely with the blank side of the ball facing upward. Another golfer may find that the line improves commitment and creates a more consistent routine.
The most practical solution is to test both approaches rather than assume one is automatically better.
Hit a meaningful number of putts with and without the line while tracking:
- Starting-line accuracy
- Make percentage
- Distance control
- Confidence over the ball
- Time required to complete the routine
The same principle applies to putter alignment markings. A long line, multiple lines, a dot, or a completely blank putter may alter how an individual golfer perceives the target.
How to Build a Productive Putting Practice Session
You do not need to complete every drill during every practice session.
A balanced session could begin with the 15-foot bungee drill to calibrate start line and break. Move next to the short-putt gate and complete a manageable consecutive-make challenge. Finish with the distance-control ladder so that the final portion of practice emphasizes feel and adaptability rather than mechanics.
The 60-foot double-breaking drill requires more space and a suitable section of the practice green, so it may be better used occasionally rather than during every session.
The entry-point drill can be added whenever you have access to the device or another way to create a smaller high-side target.
The important feature shared by all five drills is that each putt provides understandable feedback. You should know whether an unsuccessful result came primarily from the start line, pace, read, or execution.
Final Thoughts
The best putting drills do more than ask you to hit the same putt repeatedly.
They establish a specific target, provide immediate feedback, and create consequences for poor execution. These five stations trained nearly every major putting skill:
- The bungee drills made the starting line visible.
- The long double-breaker connected speed with green reading.
- The short-putt gate developed confidence and pressure tolerance.
- The ladder drill created measurable distance-control goals.
- The entry-point device improved visualization around the cup.
The clinic also reinforced the value of having a knowledgeable coach watch the practice. A drill can show you what the ball is doing, but an instructor can often explain why it is happening and make sure you are not practicing the wrong solution.
For my own stroke, the biggest takeaways were creating a more balanced motion, reducing the urge to accelerate aggressively through impact, and allowing my arms to remain softer and more connected to my body.
Those may not be the correct changes for every golfer. The drills, however, provide a strong framework for anyone who wants to replace random putting practice with focused, measurable work.
Discover more from Ten to Scratch
Subscribe to get the latest posts sent to your email.